The best explanation about ICEfaces can be seen at their website, http://www.icefaces.org/main/home/.
Now, the step to install it on the NetBeans 6.5.1:
1. Run NetBeans 6.5.1.
2. Navigate to the Tool -> Plugins. Go to Available Plugins tab, type "icefaces" on the search box. It is already there. However, they are not the latest version. Go with them if you just want to try ICEfaces. Install them and you are finish. Otherwise, follow the next steps to install the latest version (as for today it is ICEfaces 1.8.1 20090526).
3. Using your favourite browser go to http://www.icefaces.org/main/downloads/os-downloads.iface?category=NetBeans look for the plugin for NetBeans 6.5. Downloand it.
4. After finish downloading the file, extract it somewhere, for example in you Desktop or Download folder.
5. Back to NetBeans window, in Plugins window. Navigate to Downloaded tab. Click on "Add plugins ...". Navigate to where you extract the files and select org-icefaces-netbeans-modules-lib.nbm, org-icefaces-netbeans-modules-visualweb-frameworks.nbm, and org-icefaces-netbeans-modules-web-frameworks.nbm under nbms folder on your extracted folder. Then, click on "Install" button to start the installation.
6. During the installation process, a warning about the signing but not trusted plugin will appear. Just click on "Continue". This warning is appeared because this is not yet verified by NetBeans.
7. After the installation of the plugin is finished. Close the Plugins window. Start a new project and verify that the plugin has been installed by looking whether you can make a new Project, Web -> Web application then on the last wizard page (4. Framework), you can see "ICEfaces" and "Visual Web ICEfaces".
Now, that the ICEfaces is installed on the NetBeans, see you on the next day to "play" with it.
Tuesday, June 9, 2009
Managing your wealth with Buddy Day 5: Create transaction
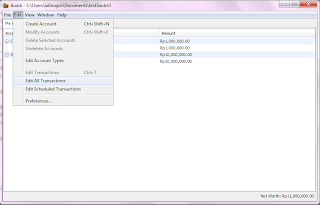
The menu is not really clear and on the spot. In my opinion, Buddy is a great application but it is suffered a usability problem. My recommendation is to split the menu for Budget, Account and Transaction, not put all of them under one "Edit" menu. Additionally, the title of the command is not consistent through out the application. To enter new budget or Account we use term "Create" but for transactions, we use "Edit All Transactions". However, the scheduled transactions is a good feature.
To enter a transaction, open the menu under Edit -> Edit All Transaction
Next, the transaction window will appear. Enter the new transaction at the bottom of the window with minimum date, description, amount, from and to values must be filled. Click on "Record" button to save the transaction. "Clear" to reset the form. Edit the transaction by selecting the transaction the click on "Update" button.
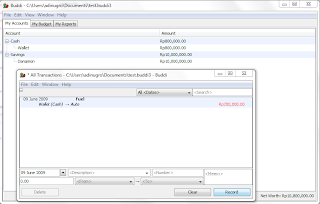
There are two kinds of Delete transaction, one is VOID (appear in transactions window but not affecting the balance) and the other one is DELETE (removing completely from the transaction).
It has been 9 days now in operation. My wife and I love it very much. Especially, the encryption feature. Despite the usability problem.
I understand this is not the full review of Buddy since I am preparing new website for all of the tutorials. Until then, goodbye for now.
To enter a transaction, open the menu under Edit -> Edit All Transaction
Next, the transaction window will appear. Enter the new transaction at the bottom of the window with minimum date, description, amount, from and to values must be filled. Click on "Record" button to save the transaction. "Clear" to reset the form. Edit the transaction by selecting the transaction the click on "Update" button.
There are two kinds of Delete transaction, one is VOID (appear in transactions window but not affecting the balance) and the other one is DELETE (removing completely from the transaction).
It has been 9 days now in operation. My wife and I love it very much. Especially, the encryption feature. Despite the usability problem.
I understand this is not the full review of Buddy since I am preparing new website for all of the tutorials. Until then, goodbye for now.
Wednesday, June 3, 2009
Managing your wealth with Buddi Day 4: Create budgets
The other thing also important in managing your wealth is setting your budget, your spending limit. It used to be easy since there is no credit card, or it would be easy for people not using credit card since the limit is the money available in your hand. However, it is also no good. We need to set the budget for our expenses, so that we do not waste our money on something useless. In some cases, unpredictable emergency expenses also need to be allocated. Finally, they are depending on yourself as the manager to manage the budget. In Buddy you can create budget as follow:
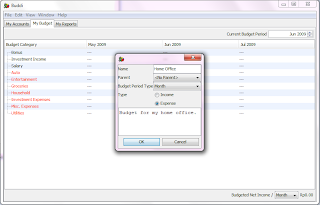
1. Run Buddy, navigate to "Budget" tab and click on Edit -> Create Budget
2. You can create category of your budget here. In addition, you also can create subcategory of a category, see the sample below:

3. Finally your budget summary is below:

That's it for today.
1. Run Buddy, navigate to "Budget" tab and click on Edit -> Create Budget
2. You can create category of your budget here. In addition, you also can create subcategory of a category, see the sample below:


3. Finally your budget summary is below:

That's it for today.
Managing your wealth with Buddi Day 3: Create account
After finish with setting the environment, we should make some accounts first. This accounts are important so that we can withdraw the money from.
1. Run Buddy.
2. Click on Edit -> Create Account. new window will appear.
3. Make an account of type Cash, for example name it as wallet.
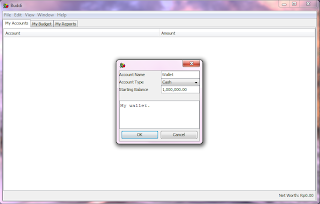
4. Also input other type of accounts you have, such as Investment or Savings.
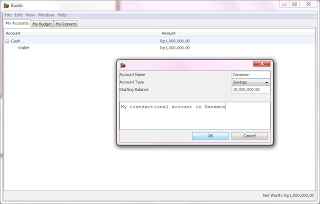
5. Finally, you will have all of your accounts in Buddy as below.

Next day, we will see how to create budgets.
Tuesday, June 2, 2009
Managing your wealth with Buddi Day 2: Setup the environment
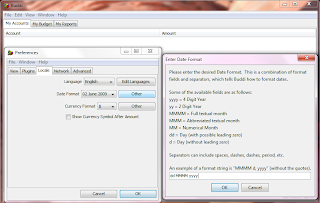
Printing out my account books is taking time. Beforehand, I also want to setup the environment. The setting would involves date and currency format. Navigate to Edit -> Preference -> Locale:
1. Setting date: I choose to use "dd MMMM yyyy", you can create anything you want with the combination of d, M and y.
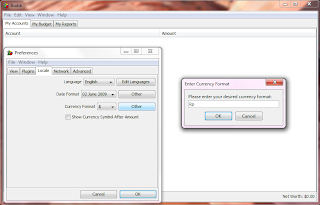
2. Setting currency: I put "Rp" here. [See suggestion below]
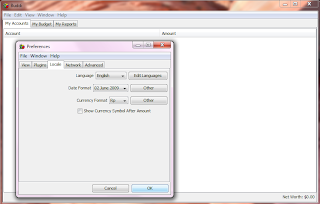
3. Final setting.
Suggestions:
I would ask a feature which is a capability to enter other currency including the exchange rate since some people have some accounts in different currency.
That's all for today.
1. Setting date: I choose to use "dd MMMM yyyy", you can create anything you want with the combination of d, M and y.

2. Setting currency: I put "Rp" here. [See suggestion below]

3. Final setting.

Suggestions:
I would ask a feature which is a capability to enter other currency including the exchange rate since some people have some accounts in different currency.
That's all for today.
Subscribe to:
Posts (Atom)