The best explanation about ICEfaces can be seen at their website, http://www.icefaces.org/main/home/.
Now, the step to install it on the NetBeans 6.5.1:
1. Run NetBeans 6.5.1.
2. Navigate to the Tool -> Plugins. Go to Available Plugins tab, type "icefaces" on the search box. It is already there. However, they are not the latest version. Go with them if you just want to try ICEfaces. Install them and you are finish. Otherwise, follow the next steps to install the latest version (as for today it is ICEfaces 1.8.1 20090526).
3. Using your favourite browser go to http://www.icefaces.org/main/downloads/os-downloads.iface?category=NetBeans look for the plugin for NetBeans 6.5. Downloand it.
4. After finish downloading the file, extract it somewhere, for example in you Desktop or Download folder.
5. Back to NetBeans window, in Plugins window. Navigate to Downloaded tab. Click on "Add plugins ...". Navigate to where you extract the files and select org-icefaces-netbeans-modules-lib.nbm, org-icefaces-netbeans-modules-visualweb-frameworks.nbm, and org-icefaces-netbeans-modules-web-frameworks.nbm under nbms folder on your extracted folder. Then, click on "Install" button to start the installation.
6. During the installation process, a warning about the signing but not trusted plugin will appear. Just click on "Continue". This warning is appeared because this is not yet verified by NetBeans.
7. After the installation of the plugin is finished. Close the Plugins window. Start a new project and verify that the plugin has been installed by looking whether you can make a new Project, Web -> Web application then on the last wizard page (4. Framework), you can see "ICEfaces" and "Visual Web ICEfaces".
Now, that the ICEfaces is installed on the NetBeans, see you on the next day to "play" with it.
Tuesday, June 9, 2009
Managing your wealth with Buddy Day 5: Create transaction
The menu is not really clear and on the spot. In my opinion, Buddy is a great application but it is suffered a usability problem. My recommendation is to split the menu for Budget, Account and Transaction, not put all of them under one "Edit" menu. Additionally, the title of the command is not consistent through out the application. To enter new budget or Account we use term "Create" but for transactions, we use "Edit All Transactions". However, the scheduled transactions is a good feature.
To enter a transaction, open the menu under Edit -> Edit All Transaction
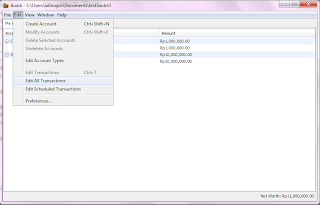
Next, the transaction window will appear. Enter the new transaction at the bottom of the window with minimum date, description, amount, from and to values must be filled. Click on "Record" button to save the transaction. "Clear" to reset the form. Edit the transaction by selecting the transaction the click on "Update" button.
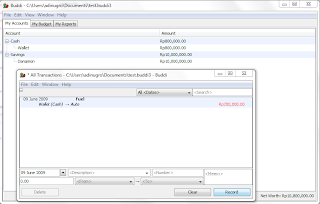
There are two kinds of Delete transaction, one is VOID (appear in transactions window but not affecting the balance) and the other one is DELETE (removing completely from the transaction).
It has been 9 days now in operation. My wife and I love it very much. Especially, the encryption feature. Despite the usability problem.
I understand this is not the full review of Buddy since I am preparing new website for all of the tutorials. Until then, goodbye for now.
To enter a transaction, open the menu under Edit -> Edit All Transaction
Next, the transaction window will appear. Enter the new transaction at the bottom of the window with minimum date, description, amount, from and to values must be filled. Click on "Record" button to save the transaction. "Clear" to reset the form. Edit the transaction by selecting the transaction the click on "Update" button.
There are two kinds of Delete transaction, one is VOID (appear in transactions window but not affecting the balance) and the other one is DELETE (removing completely from the transaction).
It has been 9 days now in operation. My wife and I love it very much. Especially, the encryption feature. Despite the usability problem.
I understand this is not the full review of Buddy since I am preparing new website for all of the tutorials. Until then, goodbye for now.
Wednesday, June 3, 2009
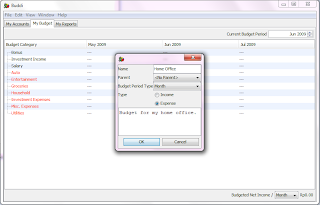
Managing your wealth with Buddi Day 4: Create budgets
The other thing also important in managing your wealth is setting your budget, your spending limit. It used to be easy since there is no credit card, or it would be easy for people not using credit card since the limit is the money available in your hand. However, it is also no good. We need to set the budget for our expenses, so that we do not waste our money on something useless. In some cases, unpredictable emergency expenses also need to be allocated. Finally, they are depending on yourself as the manager to manage the budget. In Buddy you can create budget as follow:
1. Run Buddy, navigate to "Budget" tab and click on Edit -> Create Budget
2. You can create category of your budget here. In addition, you also can create subcategory of a category, see the sample below:

3. Finally your budget summary is below:

That's it for today.
1. Run Buddy, navigate to "Budget" tab and click on Edit -> Create Budget
2. You can create category of your budget here. In addition, you also can create subcategory of a category, see the sample below:


3. Finally your budget summary is below:

That's it for today.
Managing your wealth with Buddi Day 3: Create account
After finish with setting the environment, we should make some accounts first. This accounts are important so that we can withdraw the money from.
1. Run Buddy.
2. Click on Edit -> Create Account. new window will appear.
3. Make an account of type Cash, for example name it as wallet.
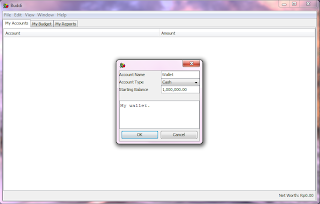
4. Also input other type of accounts you have, such as Investment or Savings.
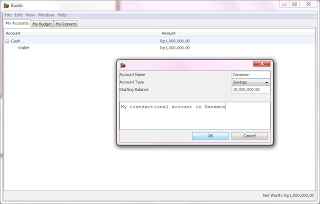
5. Finally, you will have all of your accounts in Buddy as below.

Next day, we will see how to create budgets.
Tuesday, June 2, 2009
Managing your wealth with Buddi Day 2: Setup the environment
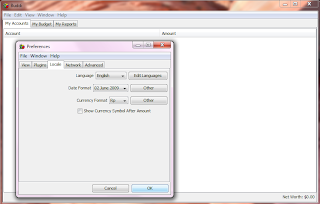
Printing out my account books is taking time. Beforehand, I also want to setup the environment. The setting would involves date and currency format. Navigate to Edit -> Preference -> Locale:
1. Setting date: I choose to use "dd MMMM yyyy", you can create anything you want with the combination of d, M and y.
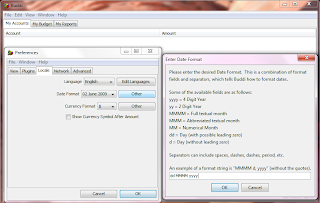
2. Setting currency: I put "Rp" here. [See suggestion below]
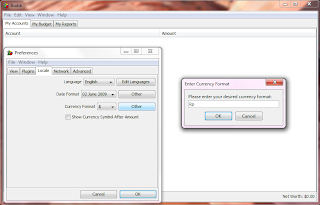
3. Final setting.
Suggestions:
I would ask a feature which is a capability to enter other currency including the exchange rate since some people have some accounts in different currency.
That's all for today.
1. Setting date: I choose to use "dd MMMM yyyy", you can create anything you want with the combination of d, M and y.

2. Setting currency: I put "Rp" here. [See suggestion below]

3. Final setting.

Suggestions:
I would ask a feature which is a capability to enter other currency including the exchange rate since some people have some accounts in different currency.
That's all for today.
Sunday, May 31, 2009
Managing your wealth with Buddi Day 1: Installation day
Have you ever notice how much have you been spent monthly on shopping? or how much have you been spent on food? If not, then you need buddi. I read the review of buddi on Info Linux (Indonesian open source magazine). I think I will try this to see my spending. I used to be using Excel. It was good but I was too lazy to update it. Anyway, let's try it:
1. Download buddi from its website. It is available for Windows, MacOS and Linux. The main reason why I want to try this is that buddi is developed using Java. I choose to try this on Windows 7 RC, so I download the Windows version.
2. After finished download it, run the installer. It is very easy, just run it and accept all default values.
3. Buddi is now already installed on my Windows 7 machine. Run Buddi, you will be welcomed with "Make a donation" page, simply click on "Not now" (please make a donation if you think it is helping you. Disclaimer: I am not having any kind of relationship with this product or the eprson behind it. Just think that it would be nice to encourage the developer in maintaning and further developing this product).
That is for now, today I will check all of my bank accounts so I can input my "wealth".
Saturday, May 30, 2009
Symfony of Love Day 2: Business Case
On the day 1, I already defined the simple requirements for my new project. Now, going further to define the business case. I made an observation on how my wife running the business. Below are the scenario,
1. Items are coming from the supplier.
a. When items are coming from supplier, their information should be recorded into the system. The important information are Item name, description, weight, photo (yes, it would be nice to have the picture of it), purchase price, quantity, minimum stock level for re-ordered and also the storage location if already decided. Otherwise, a default location would be supplier by the system.
b.When the item is not yet in the system, there should be a new window displayed to record the information of the new item.
c. After all items have been recorded, a summary page is displayed listing all items received from a supplier, then supplier information is also entered including the shipping cost.
d. Next step is to determine the sale price. The items are displayed in a table contains information about purchase price, shipping cost, suggested sale price (5% profit, 10%profit, 15% profit, 20% profit, 25% profit, 30% profit, 40% profit and 50% profit). The last column would be final sale price.
e. After sale prices are determined. The process is finished and back to main menu.
2. Customer makes a purchase.
a. When customer makes a purchase, a window displayed to provide the operator to record the items to be delivered to the customer. The information needed is item id/name, quantity and delivery date, due payment date, the customer information and also the payment method.
b. After all information required are recorded, operator should be able to print out the invoice. Two invoices are generated. One with the "Copy" watermark and the other one is "Paid" watermark.
3. Management.
a. CRUD of items (stock management), customers and payment method.
I know, probably this is what I would not do in the real business case. However, I am short of time at the moment ;( so that's all for today.
Thursday, May 28, 2009
Symfony of Love Day 1: Introduction
Why I called this project as Symfony of love? There are two reasons, first and the most important one is because I dedicated this project to my wife and second, I hope I can learn Symfony.
Background:
It has been few years that my wife is running her business from home. She sometimes asks for a software to help her in managing her business to replace her old excel system. I called it an excel system, since it is actually a system that is utilizing excel. Not the excel is the core of the system, but how she defined the procedures and utilized the sheets to do the calculation are the core of the system. Remember, excel is only the tool. One day, when we do not have access to excel, she can open and run it in OpenOffice Calc (good to hear!).
Objective:
Create a system to help small business in managing stock, price and orders. I know there are many and probably better solution for her (and others) but making one for your special one is very special!!!
Requirements:
I make it as simple as possible for the version 0.1:
R1. The system shall be able to be used to manage the stock of a product including its location. A notification will be issued when an item has reached a certain level thus need to be reordered.
R2. The system shall be able to be used to manage orders from clients including the their payment information.
R3. The system shall be able to be used to help in calculating the selling price.
I know they are still very broad requirements and i will make them more detail and clear in the business case on the next day.
Secure VPS Day 2: IPTables
I got a problem. Unfortunately, IPTables are not included in the Ubuntu kernel on the vps I used. Activate it would take some time, so I decided to reinstall my vps and use Debian 4 image instead. The steps for day 1 are the same as in ubuntu, only that sudo package is not installed by default. Install it by running:
debian:~# apt-get sudo
Now, check the iptables configuration:
cath@debian:~$ sudo iptables -L
We trust you have received the usual lecture from the local System
Administrator. It usually boils down to these three things:
#1) Respect the privacy of others.
#2) Think before you type.
#3) With great power comes great responsibility.
Password:
Chain INPUT (policy ACCEPT)
target prot opt source destination
Chain FORWARD (policy ACCEPT)
target prot opt source destination
Chain OUTPUT (policy ACCEPT)
target prot opt source destination
cath@debian:~$
Save old configuration (if any, usually the rules is still empty):
cath@debian:~$ sudo iptables-save > /etc/iptables.up.rules
Create new rules:
cath@debian:~$ sudo vim /etc/iptables.test.rules
*filter
# Allows all loopback (lo0) traffic and drop all traffic to 127/8 that doesn't use lo0
-A INPUT -i lo -j ACCEPT
-A INPUT -i ! lo -d 127.0.0.0/8 -j REJECT
# Accepts all established inbound connections
-A INPUT -m state --state ESTABLISHED,RELATED -j ACCEPT
# Allows all outbound traffic
-A OUTPUT -j ACCEPT
# Allows HTTP and HTTPS connections from anywhere (the normal ports for websites)
-A INPUT -p tcp --dport 80 -j ACCEPT
-A INPUT -p tcp --dport 443 -j ACCEPT
# Allows SSH connections
#
# THE -dport NUMBER IS THE SAME ONE YOU SET UP IN THE SSHD_CONFIG FILE
#
-A INPUT -p tcp --dport 2987 -j ACCEPT
# Reject ping
-A INPUT -p icmp -m icmp --icmp-type 8 -j REJECT
# log iptables denied calls
-A INPUT -m limit --limit 5/min -j LOG --log-prefix "iptables denied: " --log-level 7
# Reject all other inbound - default deny unless explicitly allowed policy
-A INPUT -j REJECT
-A FORWARD -j REJECT
COMMIT
Use above rules in iptables:
cath@debian:~$ sudo iptables-restore < /etc/iptables.test.rules
Check it to see the differences:
cath@debian:~$ sudo iptables -L
Chain INPUT (policy ACCEPT)
target prot opt source destination
ACCEPT 0 -- anywhere anywhere
REJECT 0 -- anywhere loopback/8 reject-with icmp-prt-unreachable
ACCEPT 0 -- anywhere anywhere state RELATED,ESTALISHED
ACCEPT tcp -- anywhere anywhere tcp dpt:www
ACCEPT tcp -- anywhere anywhere tcp dpt:https
ACCEPT tcp -- anywhere anywhere tcp dpt:2987
REJECT icmp -- anywhere anywhere icmp echo-request eject-with icmp-port-unreachable
LOG 0 -- anywhere anywhere limit: avg 5/min brst 5 LOG level debug prefix `iptables denied: '
REJECT 0 -- anywhere anywhere reject-with icmp-prt-unreachable
Chain FORWARD (policy ACCEPT)
target prot opt source destination
REJECT 0 -- anywhere anywhere reject-with icmp-prt-unreachable
Chain OUTPUT (policy ACCEPT)
target prot opt source destination
ACCEPT 0 -- anywhere anywhere
cath@debian:~$
cath@debian:~$
cath@debian:~$ cath@debian:~$ sudo vim /etc/iptables.test.rules
-su: cath@debian:~$: command not found
cath@debian:~$
Finally, test it:
Pinging ppa16.vpsfarm.com [209.9.227.210] with 32 bytes of data:
Reply from 209.9.227.210: Destination port unreachable.
Reply from 209.9.227.210: Destination port unreachable.
Reply from 209.9.227.210: Destination port unreachable.
Reply from 209.9.227.210: Destination port unreachable.
Ping statistics for 209.9.227.210:
Packets: Sent = 4, Received = 4, Lost = 0 (0% loss),
There it is for day 2. I am searching again for other tips and tricks to secure our vps. Till then, good bye for now!
Wednesday, May 20, 2009
Secure VPS Day 1: Use different port for SSH
One of my commercial project requires me to setup TRAC to manage the development phase. Hence, I need to secure my server that will host TRAC. I understand this is only basic but should be enough to start with.
Today, I will redirect the SSH to use other port. The idea behind it is that they way to login to the server needs IP Address (hostname), port number, username and password. IP Address/hostname you cannot do anything with this since this is the location of the server. Barebone VPS will use default values for port number (=22) and username (=root). There only left the password is unknown to the public. However, if we change the port number and not permitting root to login via ssh, instead using other user. We can DELAY people to get into your server. I said DELAY because it would be not too dificult to get the port number.
Step 1: login to your vps. I am using VPSFarm again. Check you email to get the password.
Step 2: Change the password to make it easier to you to remember but harder for other people to guess.
To access official Ubuntu documentation, please visit:http://help.ubuntu.com/
root@ubuntu-pristine:~# passwd
Enter new UNIX password:
Retype new UNIX password:
passwd: password updated successfully
root@ubuntu-pristine:~#
Step 3: Add a new user specially for SSH connection, I would give it a name "onin".
root@ubuntu-pristine:~# adduser onin
Adding user `onin' ...
Adding new group `onin' (1000) ...
Adding new user `onin' (1000) with group `onin' ...
Creating home directory `/home/onin' ...
Copying files from `/etc/skel' ...
Enter new UNIX password:
Retype new UNIX password:
password updated successfully
Changing the user information for onin
Enter the new value, or press ENTER for the default
Full Name []: Onin
Room Number []:
Work Phone []:
Home Phone []:
Other []:
Is the information correct? [y/N] y
root@ubuntu-pristine:~#
Step 4: Change SSH setting.
root@ubuntu-pristine:~# vim /etc/ssh/sshd_config
Set these values to:
Port 2987(change to your choiche, on mine it is on line #5 )
PermitRootLogin no (line #26)
X11Forwarding no (line #62)
UsePAM no (line #77)
AllowUsers onin (added new on line #78)
Step 4: Restart SSH server. Do not close this session, for backup connection if somehow your new ssh setting does not work.
a. Test to connect to the server again using old setting, result: does not work! (as expected).
b. Login to the server again to the port 2987 user "root": does not work! (as expected).
login as: root
root@ppa16.vpsfarm.com's password:
Access denied
c. Login to the server using port 2987 and user "onin" : WORKING (hurray!).
Step 5: Now, you are on the server. You have a choice to :
a. sudo su
b. create another user and give this user "admin" rights (the reason, ubuntu usually discourage you work as root and prefer we work using a user with admin rights):
root@ubuntu-pristine:~# su -l root
root@ubuntu-pristine:~# adduser cath
Adding user 'cath' ...
Adding new group 'cath' (1001) ...
Adding new user 'cath' (1001) with group `cath' ...
Creating home directory `/home/cath' ...
Copying files from `/etc/skel' ...
Enter new UNIX password:
Retype new UNIX password:
password updated successfully
Changing the user information for cath
Enter the new value, or press ENTER for the default
Full Name []: Cath
Room Number []:
Work Phone []:
Home Phone []:
Other []:
Is the information correct? [y/N] y
root@ubuntu-pristine:~# visudo
The content of mine
# /etc/sudoers
#
# This file MUST be edited with the 'visudo' command as root.
#
# See the man page for details on how to write a sudoers file.
#
Defaults env_reset
# Uncomment to allow members of group sudo to not need a password
# %sudo ALL=NOPASSWD: ALL
# Host alias specification
# User alias specification
# Cmnd alias specification
# User privilege specification
root ALL=(ALL) ALL
cath ALL=(ALL) ALL <-- add "cath" to here!
I opt b) for future references. That's all for today. See you next time!
Monday, May 18, 2009
idle for almost a year.....
It has been almost a year now, I did not touch my blog. Work and work and work..... :( But somehow, I feel that I want to do some personal projects again. I am thinking of starting
1) Symfony of Love
2) Free Programmer School
3) Pray on the Ice
What are they? Just wait and see .......
1) Symfony of Love
2) Free Programmer School
3) Pray on the Ice
What are they? Just wait and see .......
Subscribe to:
Posts (Atom)